The Annotation tool bar has been designed to provide the user with a set of tools for drawing on the currently displayed image. Features drawn into the Annotation Layer are relevant to the user session only and will not be seen by other users. The user now has the ability to save any object (or objects) that are added to the map. These annotation sets can be loaded back in at any time. If the user does not save the annotation sets, they will be automatically erased when the user exits the session.


Symbol
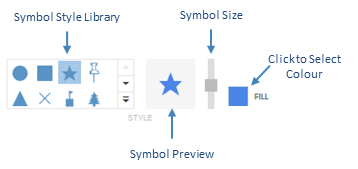
This tool allows the user to place a symbol on the Map Window. Once the symbol tool is selected, the following Style selection screen will appear to the right of the Annotation tool bar.
|
As displayed in the above image, it is now possible for the user to select a symbol from the library, choose the size from the Symbol slider and choose a colour from the colour picker. Once the user has chosen the desired size and styling click within the map window to add the symbol.

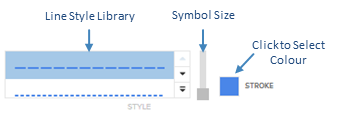
This tool allows the user to place a line on the Map Window. Once the line tool is selected the following Style selection screen will appear to the right of the Annotation tool bar.
|
As displayed in the above image it is possible to choose a fill and line colour from the colour pickers and adjust the line width from the line size slider. Once the user has chosen the desired size and styling, it is possible to add the rectangle to the map by moving the cursor to the point in the map you wish to insert the rectangle then left click and hold down the mouse button, this will anchor the start point of the user rectangle. As the user drags the mouse away while holding down the left mouse button the user can create the rectangle to the desired size. To complete the object release the left mouse button. The user can press the "Esc" key while drawing the rectangle to cancel the draw.

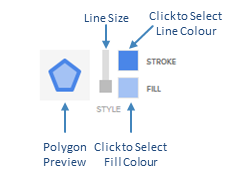
This tool will allow the user to draw a Polygon or Region on the Map Window. Once the line tool is selected the following Style selection screen will appear to the right of the Annotation tool bar.
|
As displayed in the above image it is now possible for the user to choose a fill and line colour from the colour pickers and adjust the line width from the line size slider. Once the user has chosen the desired size and styling, it is then possible to add the polygon to the map.
To start drawing, the user can left-click in the Map Window. This will anchor the start point of the polygon. The user can then drag the mouse away from this location and left-click on a new location on the map. A line is drawn between the two locations. This process is then repeated to continue drawing the polygon object. To finalise and close the polygon the user can double left-click on the screen and the region will automatically be 'closed' and drawn on the map window. The user can press the "Esc" key while drawing the rectangle to cancel the draw.
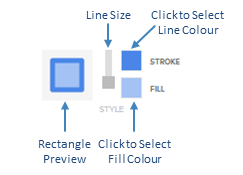
This tool will allow the user to draw a Rectangle on the Map Window. Once the rectangle tool is selected the following Style selection screen will appear to the right of the Annotation tool bar.
|
As displayed in the above image it is now possible to choose a fill and line colour from the colour pickers and adjust the line width from the line size slider. Once the user has chosen the desired size and styling, it is possible to add the rectangle to the map user object simply left-click and hold down the mouse button in the Map Window. This will anchor the start point of the user rectangle. As the user drags the mouse away from To start drawing the this point the user will see the rectangle anchored to that location. Whilst dragging the mouse, the user can rotate the rectangle object at the same time as resizing it, by moving the mouse to the left and right. To complete the object release the left mouse button. The user can press the "Esc" key while drawing the rectangle to cancel the draw.

This tool will allow the user to draw a Circle on the Map Window. Once the rectangle tool is selected the following Style selection screen will appear to the right of the Annotation tool bar.
|
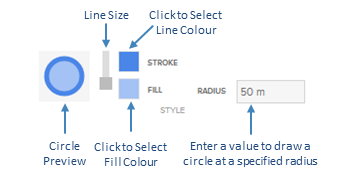
As displayed in the above image, the user can choose a fill and line colour from the colour pickers and adjust the line width from the line size slider. Once the user has chosen the desired size and styling, it is then possible to add the circle to the map.
To start drawing, left-click and hold down the mouse button in the Map Window. This will anchor the start point of the user circle. As the user drags the mouse away from this point the user will see a circle anchored to that location. Release the left mouse button to complete the circle. Press the "Esc" key while drawing the circle to cancel the draw.
Note: It is also possible to draw a circle at a set radius. Type the desired radius in the radius box i.e. as per the 50m typed in the image above then left-clicks within the Map Window.

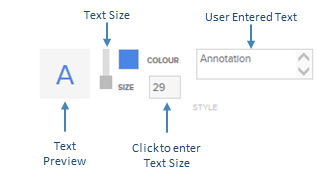
This tool allows the user to write text objects onto the map window. Once the text tool is selected the following Style selection screen will appear to the right of the Annotation tool bar.
|
As displayed in the above image, the user can adjust the text size, choose a colour and define the text to be added to the map. Once the user has chosen the desired text, size and styling options, it is then possible to add the text to the map by left clicking the desired location within the Map Window.

Edit
This tool allows the user to edit any symbols, lines, polygons or text that has previously been created in the Map Window using the above Annotation Tools (i.e. ). To edit user added object(s) select this tool and click on, or click and drag an area around, the objects that you wish to edit from the Map Window.
This tool allows the user to remove any symbols, lines, polygons or text that have previously been created in the Map Window using the above Annotation Tools (i.e.). To delete added object(s) select this tool and click on, or click and drag an area around, the objects to be removed from the Map Window.
Load Annotation Set
This tool allows the user to load pre saved annotation sets (See Save Annotation Set). To load an annotation set simply left-click on the Load tool and navigate to a predefined Annotation set.

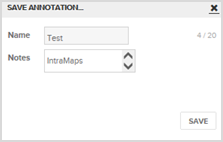
Save Annotation Set
This tool allows a user to save predefined annotation sets. Each user can have their own annotation sets saved which can be loaded at any time using the above Load Annotation Set tool. In order to save an annotation set you must first have some annotation drawn within the map window. Then left-click on the Save icon and the following screen will appear. Fill out the name and some notes, if required, and the annotation set will be saved for future use. The user can have multiple annotation sets.
|
![]()
This tool allows you to clear all the current annotation on the screen. Left-click on the Clear tool and all annotation will be removed from the screen. If the annotation has not been saved it will be cleared automatically if the user changes module or if the application has been restarted.